Monday 16 April 2012

Guitar Update Number Three

Well, it finally exists in a form that can be played. Sort of. Here is my guitar, working, with the following caveats:
  • Powered by a USB cable, not a 9V battery (battery was a bit flat)
  • Jack socket is connected by crocodile leads (need to drill a hole)
  • Only two strings (couldn't be bothered to string up the whole thing)
  • Most sensors still missing but it should be pretty easy to add them
    • Currently have six knobs and an infra-red sensor
    • Missing various push buttons, rocker switches, light sensor and accelerometer
    • Missing the "virtual strings" and fret sensors, which will require many extra weeks of thought
I feel I need to take a break from this time-sapping project for a while. But, in the meantime, enjoy:

Wednesday 4 April 2012

The Home Straight?

I've been silent on here for a while. This doesn't mean that I haven't been busy; it simply means that the tasks with which I have busied myself have been dull in nature. Wiring, soldering, swearing, rewiring, resoldering and so forth. Now, though, I have made a breakthrough that I feel is worth sharing. The main circuit is now not only WORKING but also FITS INSIDE THE GUITAR. Previously, the LCD display was mounted on a sprawling prototype breadboard and hence was far too big to fit in the guitar. Now, after several frustrating evenings of circuit board design, assembly and repair, IT FITS.

The guitar now has the following features:
  • Power distributed to sensors via blocks of screw terminals with LED power indicators
  • Three working MIDI output ports
  • LCD screen with four-button menu system (up, down, enter, back)
  • Ability to add as many sensors as there is room for on the guitar without horrendous wiring issues
The next steps are as follows:
  • Wire in six knobs, two push buttons and a light sensor
  • Add 9V power socket and latching on/off push switch
  • Attach guitar pickups to smaller output jack and restring guitar
This will give me a fully functional version of the guitar with the ability to play guitar as normal and have a lot of control over the sound on the amp, as well as some basic control of my synth and sampler, via knobs, buttons and a light sensor. Just getting this far would be a massive success, given that I only took this up as a hobby a few months ago! But there is also a list of totally feasible upgrades that would come next:
  • Fret detection and strum detection (as seen in a previous video), with note data sent to a synthesiser
  • Miniature keyboard
  • Accelerometer
Okay, bedtime now. Just wanted to get my excitement out there into cyberspace. Videos coming soon.

Saturday 25 February 2012

Something Softer

Yesterday, I published my first music app to the Android Market. The app is pretty unhelpful, inefficient and ergonomically unsatisfying, but the point is that it works, it's been published, and it was completed in roughly a day. I wanted to go through the process of designing, writing and publishing an Android app to see what was difficult and what wasn't. Here are some things I learned:

1) Although audio latency in Android is woeful, the stability of the audio stream seems pretty decent.
2) Flash makes it very easy to write and package apps, but it's very easy to slow an app to a standstill if you're not careful.
3) The search functionality in Android Market is geared towards showing people the top twenty apps for a particular search term, which is not great for small developers.
4) I've just realised that this blog has become nerdy and technical. Sorry. Here is the link to the app:

http://market.android.com/details?id=air.arpeggiator

Friday 10 February 2012

Guitar Update Number Two

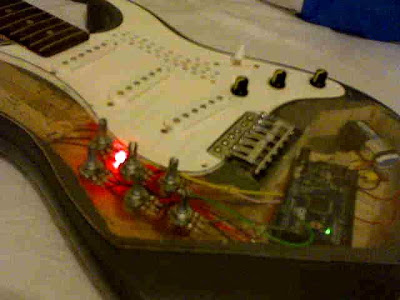
The guitar has entered the construction phase. Wednesday evening was spent in the company of Mr. Thomas Handley, who is responsible for any sawing, drilling and routing required for the project. I won't go into details now, but behold the image below! Six rotary potentiometers, happily mounted on a bespoke transparent secondary scratch-plate, successfully wired to the main circuit board, with a superfluous red LED thrown in for good measure. I have realised today that wiring this monstrosity is going to be an horrendous task; the confined space and my total lack of soldering ability are conspiring against me. And yet wires can be squashed, and solder can be poked at random until it forms the desired shape, so perhaps I will prevail. Here's the photo:


Saturday 4 February 2012

Very basic MIDI guitar system

This is an addition to the "strummable resistors" from yesterday. I set up my guitar so that whenever a string was fretted (pushed down against a particular fret), a circuit would be completed. A different chord is assigned to each fret and any strumming data then corresponds to the notes in that chord. Results shown below:


Technical info: I am aware that there are far too many wires in this video.

Strummable Resistors

Here's a quick preview of a feature that I'm rather excited about including on my guitar: strummable contacts. Many of the sensors that I am adding to the guitar are really just identical controls to those you would find on a synth or sampler, such as buttons and knobs, but I'm also really interested in any sensors that will exploit the playing style of a guitar.

My idea is to have six metal contacts, spaced to match the guitar's strings but located just below the bridge, and a metal plectrum that will complete a circuit whenever it comes into contact with one of the six "virtual strings". When twinned with a way of specifying chord shapes, this design allows for strumming or finger-picking via MIDI.

Below is a video showing a test of the design, using resistors as contacts and the end of a wire instead of a metal plectrum. Buttons are used to specify the chord shape; I hope to incorporate a more imaginative method in the final design.

Tuesday 24 January 2012

Guitar Update Number One Point Five

No video today, but I wanted to put it on the record that progress is being made in the following ways:
  • I'm now using the actual microcontroller (circuit board) that will be in the guitar, the Arduino Mega 2560. This has a lot more inputs and outputs than the Arduino Uno, which I was using before.
  • The menu system is now pretty much fully functional, allowing me to route any sensor to any MIDI parameter and adjust settings such as the minimum and maximum values a sensor can transmit.
  • I can now connect three MIDI devices simultaneously (I have been having tremendous fun controlling my synth and sampler at the same time).
  • I have tracked down a large sheet of transparent plastic which will be cut down to size and used as a giant scratch-plate to mount the sensors (and cover the large hole in the guitar).
A new video will make its way to this corner of cyberspace as soon as I've made enough progress that any new footage is easily distinguishable from previous stuff.

Sunday 8 January 2012

Guitar Update Number One

The recent lack of updates is due to the fact that I spent Christmas at home, separated from my toys. What I did have at home was my hollowed-out electric guitar and a pencil, so I spent a good chunk of the festive period in front of the fire, doodling things like "infra-red sensor goes here" on the guitar's exposed wood. I also built up a much clearer idea of how the circuitry was going to function, and my last few nights (I'm now back in Oxford) have been spent trying to realise that idea. Here is the result:


Technical info: Hardware-wise, this is similar to my previous posts, in that I am routing sensors through the Arduino and converting their signals into MIDI data. The difference here is in the programming; I have created individual classes such as "MidiDevice" (which holds data about a particular device such as the MicroKorg or my Zoom sampler), "MidiParam" (which holds data about a particular parameter on a device, such as pitch bend, filter cut-off or volume) and "Sensor" (which is a generalised class for all the types of sensor which I might end up using in the guitar). Constructing the code in this way allows massive flexibility. I want this guitar to be very versatile and to have an intuitive and easy way to adjust each sensor's settings without having to plug it into my computer and re-compile the code. I'm planning to install an SD card slot on the guitar to allow me to save any adjustments I make.


Also, the display on the final guitar won't show the sensor values every time they change - that was just to demonstrate that I have information about each sensor (well, its name, anyway) stored in the program. Constantly updating the display increases latency which, as we all know, is inversely proportional to one's ability to rock.

Thursday 5 January 2012

A Journey of 1,000 Miles Must Begin With an Easily Navigable Menu System

Nothing intrinsically musical to report on, I'm afraid. However, I have worked out how to wire up the LCD display that I'm going to install in the hollowed-out guitar that was seen in an earlier post. This will be twinned with a tiny joystick to allow for adjustments of the guitar's electronic innards.


Technical Stuff: The display requires 7 inputs. I've used a shift register so that I only need to take up three of the Arduino's outputs. Thanks to the Arduino Playground site for the code and schematics.


Other things I'm working on and may share in the coming weeks:

  • Controlling the Gakken SX-150 analogue synth via the Arduino
  • MIDI interface for Android phones/tablets
  • Colour-sensitive webcam-based MIDI controller for Windows
  • More details on THE GUITAR